
This article is part of Jurisage’s 2026 Guide to Creating Tables of Authority in Microsoft Word. Here are links to the other parts of the series:
- Tables of Authorities in Microsoft Word: An Overview
- Troubleshooting your Microsoft Word Table of Authorities: A Deeper Dive into Field Codes (this article)
- Tables of Authorities: Best Practices
- Automated Tables of Authorities: Leveraging Technology and AI for TOA Generation
In our last article, we talked about the general steps for creating a TOA in Microsoft Word. Now it’s time to dive into some of the more important details that will make your process easier and avoid errors.
Correcting citations by editing field codes
What happens if a citation doesn’t appear correctly in the TOA? For example, perhaps a pincite or errant ¶ made its way into the citation? Or the same citation appears multiple times? These are all problems that can be fixed by directly editing field codes.
As a reminder, field codes are hidden placeholders that instruct Word to insert or update specific information automatically, like dates, page numbers, cross-references, or citations. Behind the scenes, the Microsoft Word TOA tool uses field codes to mark each citation so that Word can accurately track and compile your cited cases, statutes, or regulations into an organized list.
Revealing field codes, and what they mean
There are two ways to make field codes visible.
- To make just the field codes associated with TOAs visible, click the ¶ symbol on the Home tab of the Ribbon in Microsoft Word. You can confirm that the setting is enabled because the ¶ symbol will be shaded, and you’ll start seeing all sorts of other previously-hidden characters, such as little dots between words to indicate spaces.
- You can also use the keyboard shortcut Alt+F9, but note that this will reveal all the field codes in your document, which might be a little overwhelming. Hit Alt+F9 to hide them again.
In any case, if you’ve performed the action correctly you should see the text “{TA }” with some additional cryptic text surrounding your citations. “{TA” stands for “Table of Authorities Entry”. 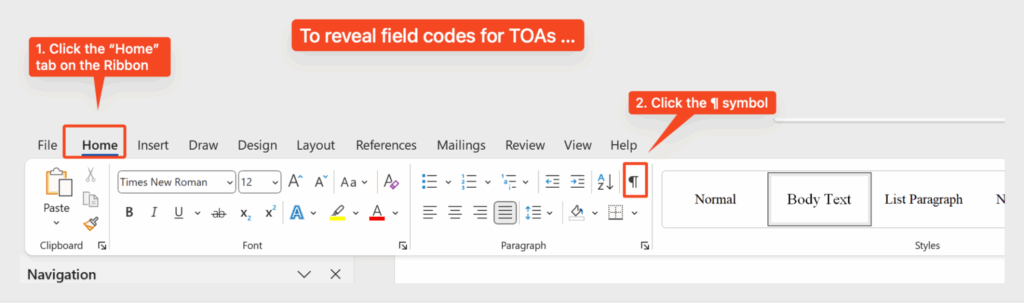
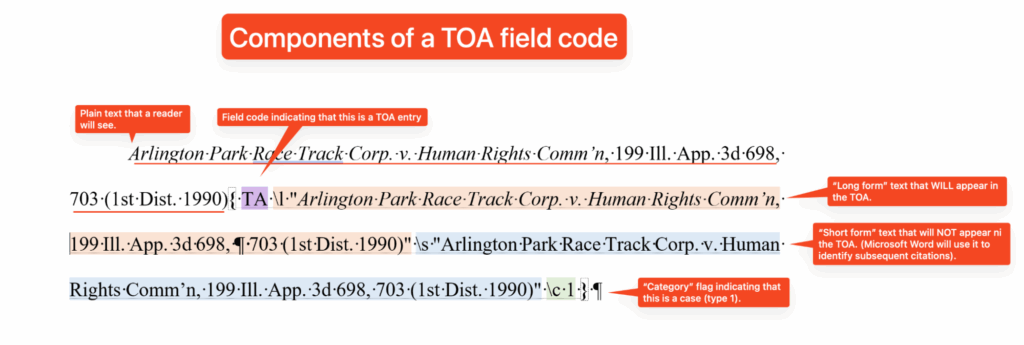
Let’s look at the components of this field code. A field code has a few parts: the type, indicated by ALL CAPS, and the flags, which are indicated by a slash character. I’ve put them into different colors for the sake of visibility.:
- Plain text. This is text that isn’t wrapped in curly brackets. This is always visible to a reader. Note that the plain text actually has nothing to do with what will appear in the TOA itself. That’s governed by what’s in the curly brackets.
- TA field code indicator (purple). This is the opening line of the field code. The text “TA” indicates that this is a TOA entry field.
- “Long form” flag (\l) (pink). This flag indicates the text that will actually appear in the TOA. Everything within the quotes will show up, exactly as written and formatted.
- “Short form” flag (\s) (blue). This flag indicates the short form of the citation. This text WILL NOT appear in the TOA, but Microsoft Word will use this text to try to identify subsequent citations.
- “Category” flag (\c) (green). This flag indicates which category the citation belongs to. The numbering will match the list of categories that appears when you mark a citation. The default is 1, meaning “case”.
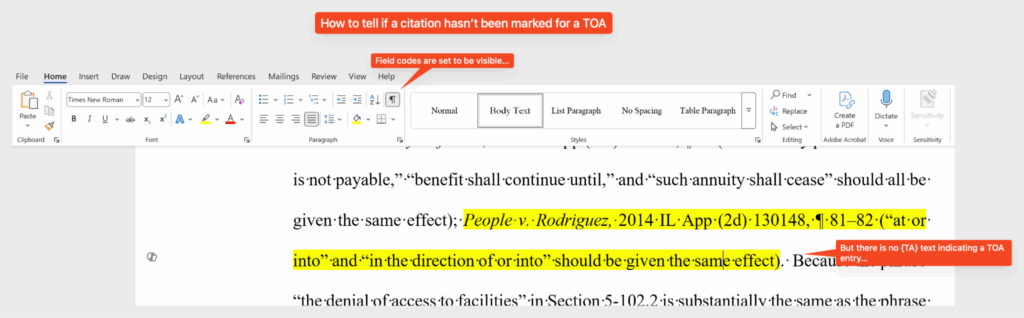
Citations not appearing in TOAs
The most likely reason a citation doesn’t appear in your TOA is because you never marked it as a citation. By revealing field codes, you can visually inspect if a citation was marked: if it doesn’t have field codes next to it, Microsoft Word can’t see it!
If this happens, you’ll need to mark the citation using the References > Mark Citation button on the Ribbon.
Correcting citations
Once you’ve generated a TOA, it might not look the way you’d expect. Consider the example of an errant pincite in a TOA citation:

The most likely reason is that you selected too much text when you were marking the citation, or otherwise didn’t adjust the text at the time. (For a refresher on marking citations, see our previous article). Let’s correct the citation.
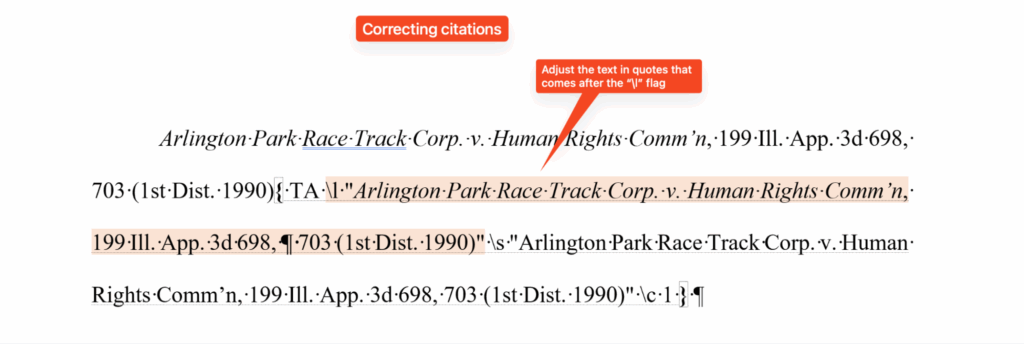
Find the first reference to the citation
First, ensure that field codes are visible. Then navigate to the first time the citation was marked. This might be tricky, so here’s a hint: the first note will contain all three of the TOA entry flags: \l, \s, and \c.
Adjust the text in quotes that comes after the \l flag
Now you can correct the text. Make the necessary changes in the text between the quotes following the \l flag.
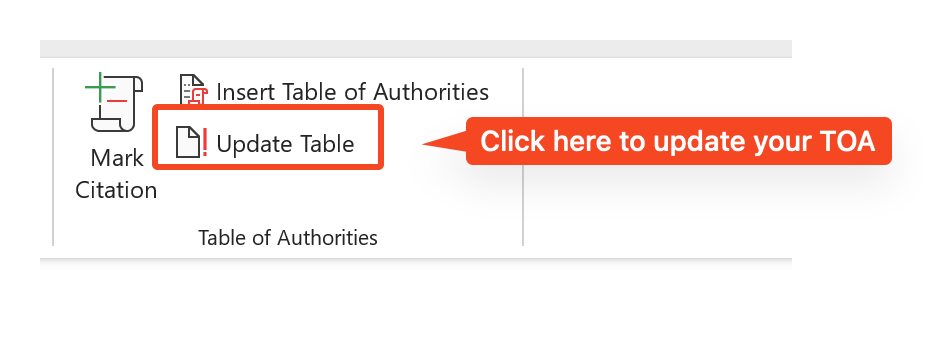
Update the TOA
The final step is to go back to the TOA and update it to reflect your changes. Place your cursor inside the TOA and click “Update Table” on the References section of the Microsoft Word Ribbon.
Fixing missing entries and duplicate entries
You’ve generated a TOA, but one of the pages where the citation occurs is missing from the TOA. Or (more rarely) you’ll see the same entry twice on the TOA.
These errors are usually due to inconsistencies in how the TOA field code is written across multiple instances of the same citation.
This can happen when you copy and paste a citation across a document. Here are a few ways:
Copying a “short” citation ahead of a “long” citation
- You mark a citation in your document as the “long form” version of a citation.
- You mark a second instance of that citation, this time as the “short” version.
- Then, you move the second instance prior to the first instance.
If a “short” citation appears before a “long” version, Microsoft Word will simply ignore the short version and only look for the long citation.
To correct this, copy the long form and paste it over the short form. In fact, you can get away with not using short forms at all!
Inconsistent short forms
Microsoft Word uses the “short form” of a citation as a unique identifier. If you edit the short form in one place but not another, then Microsoft Word won’t pick up the errant one and will not add it to the TOA.
The key here is, if at all possible, don’t edit a short form. It can only lead to trouble!
Conclusion
Microsoft Word’s built-in TOA functionality provides a useful starting point, but as we’ve explored, it does come with some quirks and limitations. While editing field codes directly can resolve many common errors, it’s important to be cautious, as manual adjustments can sometimes introduce additional challenges.
This is a good opportunity to remind you about Jurisage’s own automated TOA Builder. Microsoft Word’s built-in TOA tool gives you a strong foundation, but Jurisage’s TOA Builder is fully automated, web-based, simple to use, and available without a subscription! Give it a try and let us know what you think.